This is maybe an uncommon scenario but I was asked to write something about this topic. Let’s assume you have Aruba Wireless Gear but your switching stuff is not from Aruba. In this post, I will show how to configure Aruba Controllers or Aruba IAPs to provide Guest Access to wired users as well.
I will not make the setup more complicated than needed so I will use the local captive portal on the Controller or the IAP. I will not include ClearPass into the setup, but of course, you can do that very easily.
Wired Guest Access with Aruba Controllers
For WLAN Controller a not very common scenario, but for the Aruba SD-WAN Gateways, which are essentially the same devices, this is a very common scenario. I will describe the setup with a WLAN Controller, but the same applies to an SD-WAN Gateway.
The WLAN Controller supports trusted and untrusted ports and VLANs. All ports or VLANs which are untrusted require authentication for every mac address, seen on this port or in this VLAN. We can use this mechanism for our Wired Guest Access.
In the end, you can handle WLAN and Wired Guests the same way, using the same Captive Portal, using the same authentication mechanism, and using the same policies after authentication. This makes it a real integrated solution with the same user experience for wired and wireless users.
This sounds great? Let’s start with the configuration which is very easy as well.
One last word before actually starting the configuration. If you ever need to configure a captive portal with an Aruba Controller (not Aruba Gateway) please install and activate the PEFNG License. There are ways to get around this, BUT you will not go this road. It will give you many headaches and sleepless nights. Trust me.
First, you need to decide, which VLAN you will be using for your Wired Guest users. You can use the same VLAN as your wireless users use. I will create a new one, as I do not have wireless users in the setup. Just make sure, that this VLAN is distributed within your switching environment as well so that users on different switch ports can access it.
To create a new VLAN, go to “Configuration–>Interfaces–>VLANs” and press the “+” sign:
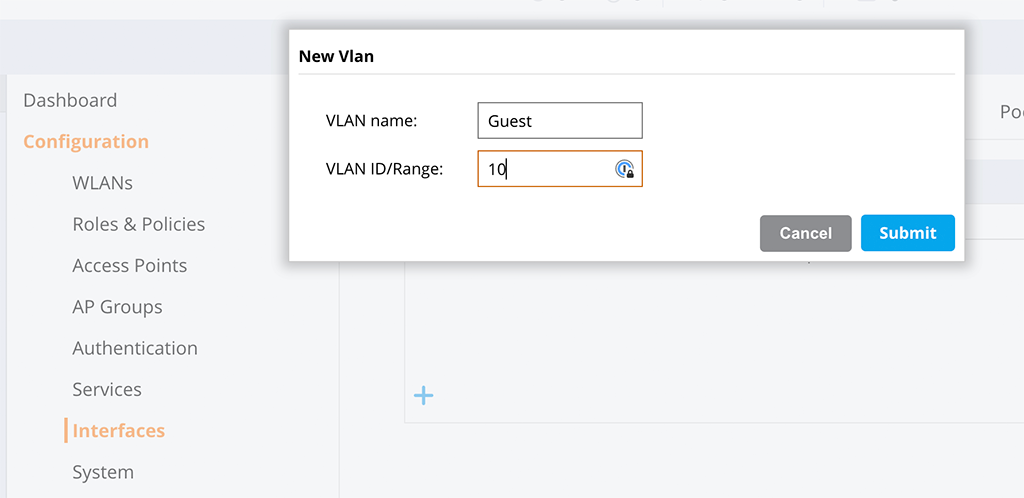
Give that new VLAN a “VLAN name” and a “VLAN ID”. Afterward, click “Submit”.
Now, select this new VLAN and assign an IP for that VLAN. Also consider, how clients should get an IP. In my case, I will use the internal DHCP server of the Aruba Controller. For smaller setups, this is fine. For large setups use an external DHCP server:
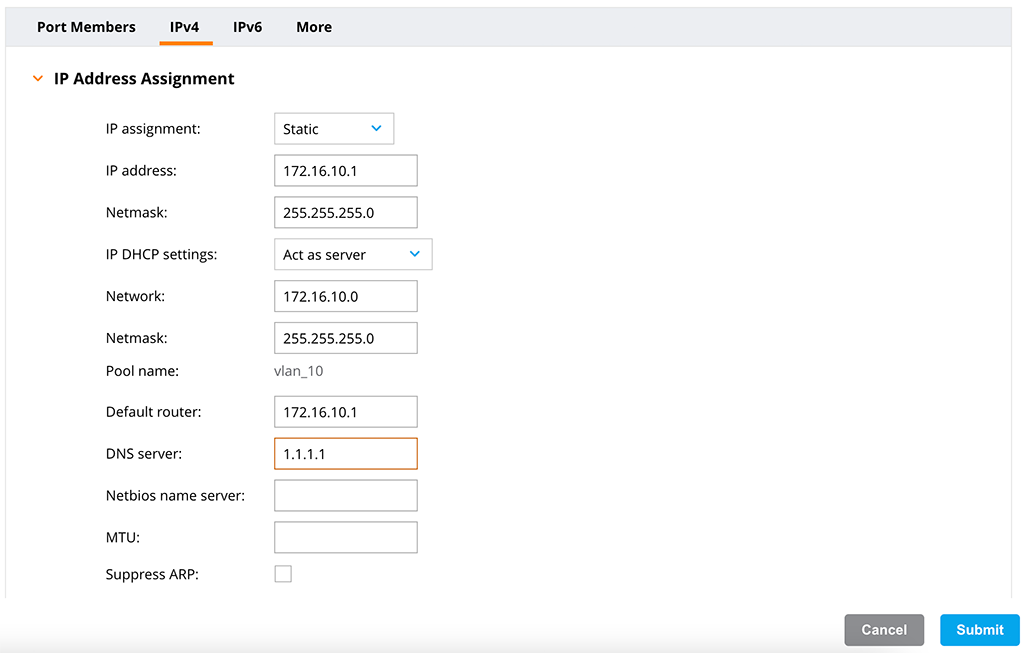
Set the “IP address” and “Netmask” and select your “IP DHCP settings”.
The last step for the VLAN is to map it to a port. I recommend using a dedicated port for this. If you need to use a trunk port for this, please refer to the table in the help documents here:
This page will explain the trusted/untrusted topic in more detail.
To assign the VLAN to a port go to “Configuration–>Interfaces–>Ports”. Select the port for the VLAN in the “Ports” table:
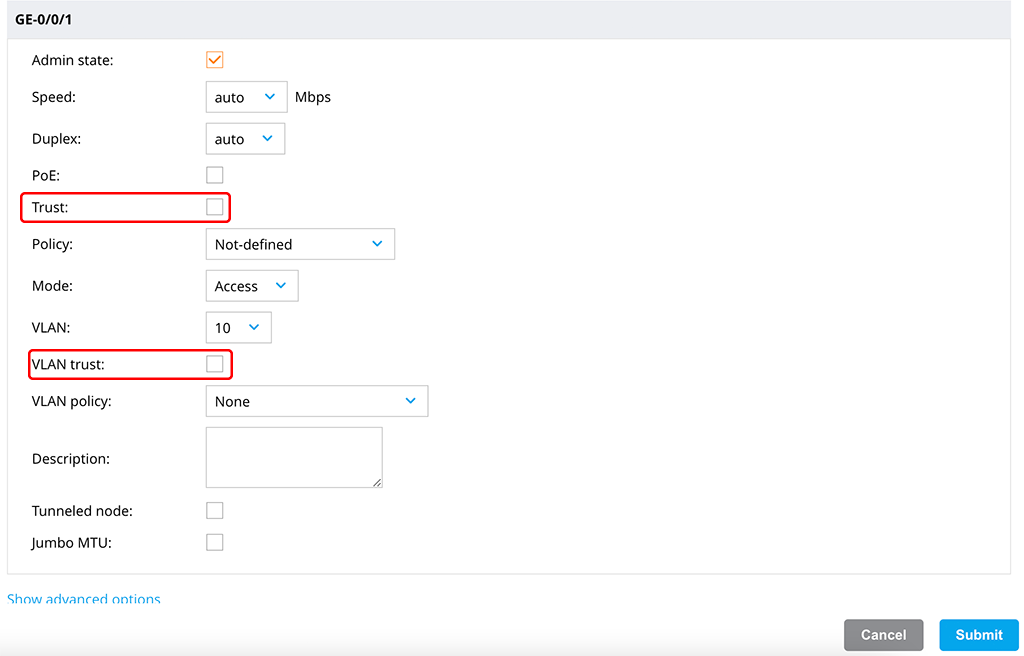
The important part is to remove the checkmark for “Trust” (for the port) and “VLAN trust” (for the VLAN). Configure the rest to your needs.
Now, create a new or alter an existing “AAA Profile”. Go to “Configuration–>Authentication–>AAA Profiles” and create a new profile or modify an existing one. For this test, I modified the “default” profile and saved it with a new name:
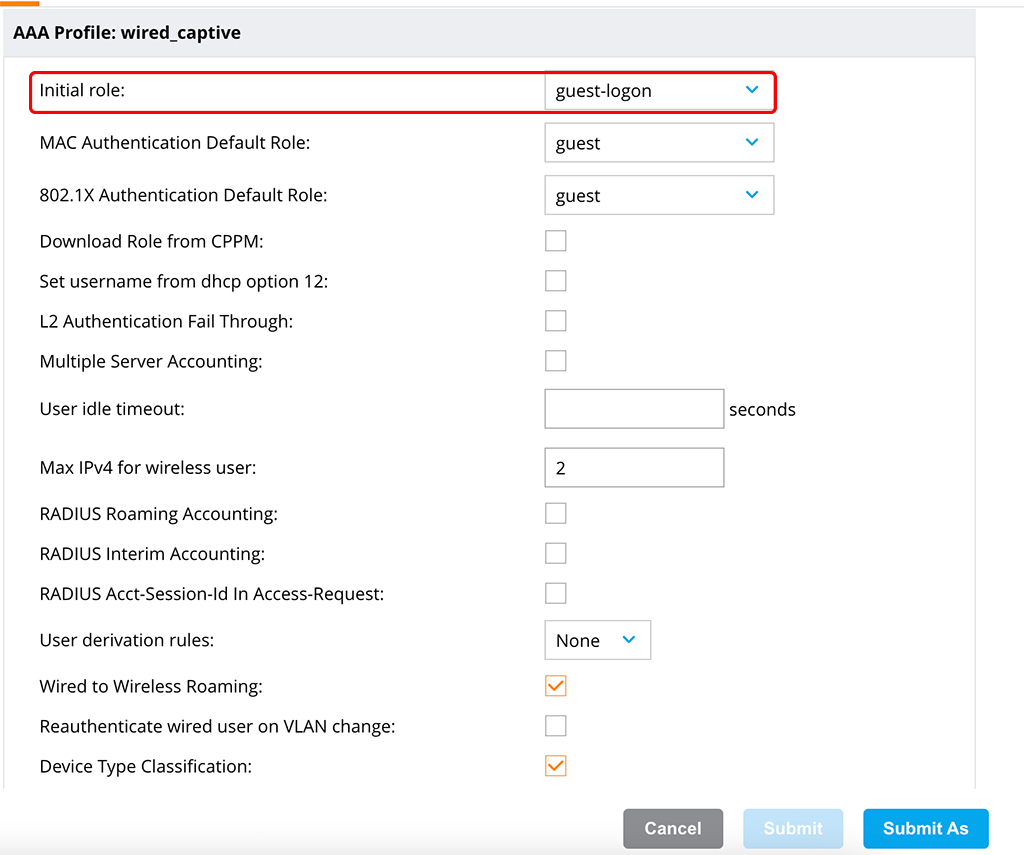
Only changed the “Initial role” field for this setup to work. Feel free to change other values as well to adapt to your environment. You can also use your existing profile for wireless users.
I changed the “guest-logon” role to only present an acknowledge screen, for simplicity.
Afterward, head over to VLANs again to assign this new or existing policy to the VLAN, created in the first part. Go to “Configuration–>Interfaces–>VLANs” and select the VLAN. Select the “More” tab. Expand the “Wired LAN” section and select the created profile:
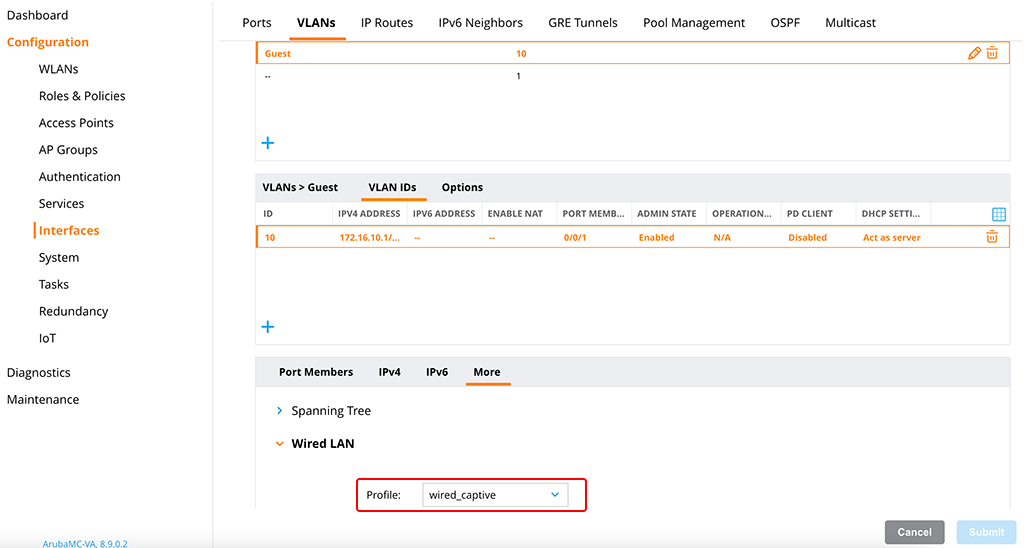
After “submit” start the test and connect a client.
You see the client in the “guest-logon” role first:
show user-table

Users
-----
    IP            MAC            Name     Role         Age(d:h:m)  Auth  VPN link  AP name  Roaming  Essid/Bssid/Phy  Profile        Forward mode  Type   Host Name  User Type
----------   ------------       ------    ----         ----------  ----  --------  -------  -------  ---------------  -------        ------------  ----   ---------  ---------
172.16.10.2  00:50:00:00:02:00            guest-logon  00:00:02                    0/0/1    Wired                     wired_captive  tunnel        Linux             WIRED

User Entries: 1/1
 Curr/Cum Alloc:1/3 Free:0/2 Dyn:1 AllocErr:0 FreeErr:0
The “User Type” is “WIRED” as well.
After the user authenticates he is in the “guest” role:
show user-table

Users
-----
    IP            MAC            Name     Role      Age(d:h:m)  Auth  VPN link  AP name  Roaming  Essid/Bssid/Phy  Profile        Forward mode  Type   Host Name  User Type
----------   ------------       ------    ----      ----------  ----  --------  -------  -------  ---------------  -------        ------------  ----   ---------  ---------
172.16.10.2  00:50:00:00:02:00            guest     00:00:04    Web             0/0/1    Wired                     wired_captive  tunnel        Linux             WIRED

User Entries: 1/1
 Curr/Cum Alloc:1/3 Free:0/2 Dyn:1 AllocErr:0 FreeErr:0
That’s it. Quite easy right?
Wired Guest Access with Aruba IAP
Let’s do the same with an Aruba IAP. With an IAP, it is even more simple. In the following paragraph, I show you how to do it.
I use an older IAP225 for this setup. The IAP runs on 8.6.0.17, but new versions work the same way. I recommend using an AP with more than 1 ethernet port. AP’s like the hospitality AP’s for example.
Connect to your IAP and go to “Configuration–>Networks”. Use the “plus”-sign to create a new network:
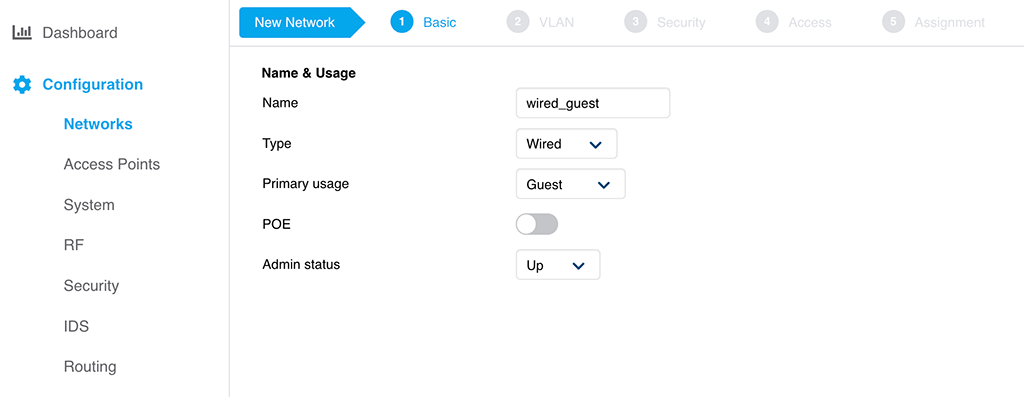
The important part in the screenshot above is the “Type”. Set this to “Wired”. If this is a guest profile with a captive portal, also select “Guest” for the “Primary usage. Press “Next” to get to the next screen:

As in the screenshot above, I change the “Mode” to “Access”. Adapt the rest to your needs. It is the same as with WLAN profiles. So the settings should be familiar to you.
Press “Next” and go to the next screen:

I choose “Internal Acknowledged” for “Splash page type” to keep the setup simple. Adapt this to your needs. You can use the same profiles as with your WLAN profiles if you have them already.
Press “Next” to proceed to the next screen:
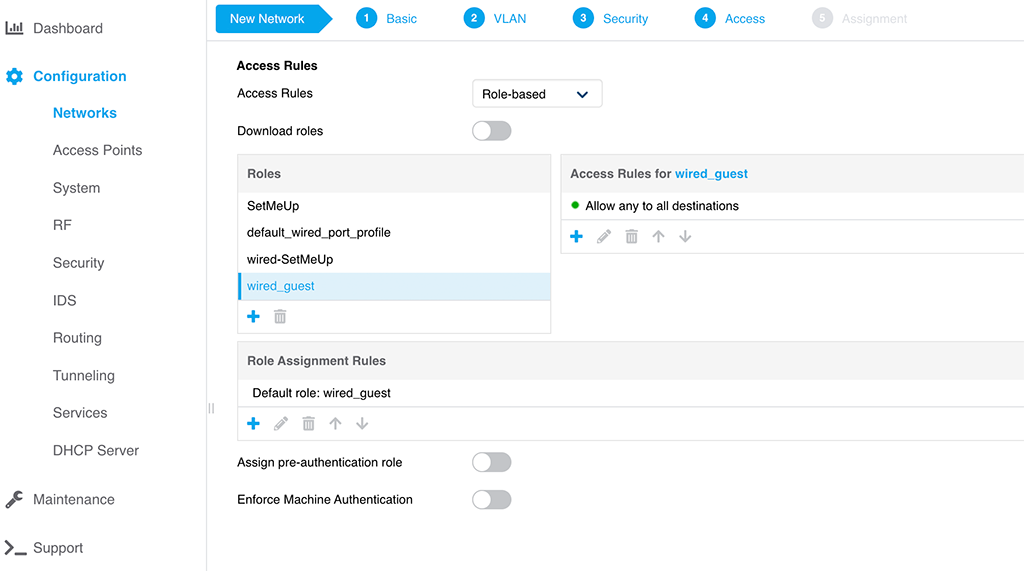
The “Access” page is simple as well. I simply use the created role for the profile without any further restrictions. As already mentioned above, adapt this to your needs.
Press “Next” to get to the next screen:

This last page is the important one. Here, attach the profile to one of the wired ports of your IAP. In my case, the IAP225 has only two ports, I select port 0/1, as 0/0 is my uplink.
Save the profile and start testing.
First, the client is in the captive portal role and needs to acknowledge the captive portal page:
show clients wired

Wired Client List
-----------------
Name             IP Address     MAC Address        OS    Network  Access Point       Role         IPv6 Address               Speed (mbps)
----             ----------     -----------        --    -------  ------------       ----         ------------               ------------
FloriansMBPWork  172.31.99.157  48:65:ee:10:1c:b2  NOFP  eth1     a0:2b:b8:86:65:00  Internal CP  fe80::18e4:3403:c826:7612  -
Info timestamp      :4199
Afterward, the client has the previously selected role:
show clients wired

Wired Client List
-----------------
Name             IP Address     MAC Address        OS    Network  Access Point       Role         IPv6 Address               Speed (mbps)
----             ----------     -----------        --    -------  ------------       ----         ------------               ------------
FloriansMBPWork  172.31.99.157  48:65:ee:10:1c:b2  OS X  eth1     a0:2b:b8:86:65:00  wired_guest  fe80::18e4:3403:c826:7612  -
Info timestamp      :4389
That’s all you need. Quite easy as well, right?
Did you use wired captive portals on different devices than switches as well?
If you find this post useful, leave me a comment and share your feedback with me. You can also buy me Pizza, using the “Buy me a Pizza” button on the right, to support this blog and keep the IT gremlin happy.
If you would like to do me a favor, share this post with your friends and social media contacts. This would really help to make this blog more popular and help others to find the information above more easily using search engines.
Share on:
Nice post. Thanks for giving such a simple “recipe”!
Do you think it would be possible to configure something similar with single-port IAPs as well? I’ve not tried it yet, but I’m thinking if you set the port as “Trunk” mode and then – in the Network’s Access tab – set a Role Assignment rule that perhaps references the “User-Vlan” attribute, it might work?
Hi Jannie,
I would not try this setup for a production environment. It could work, but you might run into issues, as the management traffic, including the cluster setup, will go through the same port. And everything needs to authenticate on that port. I’m not sure if this will work stable. Just get a 505H and use this one.
BR
Florian
Hi Florian,
Absolutely a great guide.
Regards
Flemming
thanks for the feedback. Really appreciated.
Hi Florian,
This is a amazing post, very useful.
Can you provide a guide for using Clearpass instead internal ?
Best Regards,
Chaipat
Hi Chaipat,
thanks for your feedback. You would just use an external captive portal, instead of the internal one and would point it to your ClearPass guest page. If you would like to use mac caching, you also would need to enable mac auth on that SSID.
I’m currently working on post on this one. Screenshots are already created, but I could not find the time to create post. Hopefully it will be ready within the next weeks.
BR
Florian