In this post I will show, how to UAM guest voucher modification is working. As you know, with the latest versions of UAM HP introduced the UAM guest voucher functionality. With the latest version of UAM, version UAM 7.1 E0302P06, which can be downloaded here:
https://h10145.www1.hp.com/downloads/SoftwareReleases.aspx?ProductNumber=JG752AAE
This version includes the possibility to enrich the guest voucher with a picture/logo and enhance the modification possibilities of the guest voucher itself by providing an editor from within the web GUI of UAM to change the UAM guest voucher to your needs.
The UAM guest voucher printing feature is available only for guest accounts which are managed with the selfservice portal and you can only have one voucher format for all guests.
UAM Guest Voucher Modification
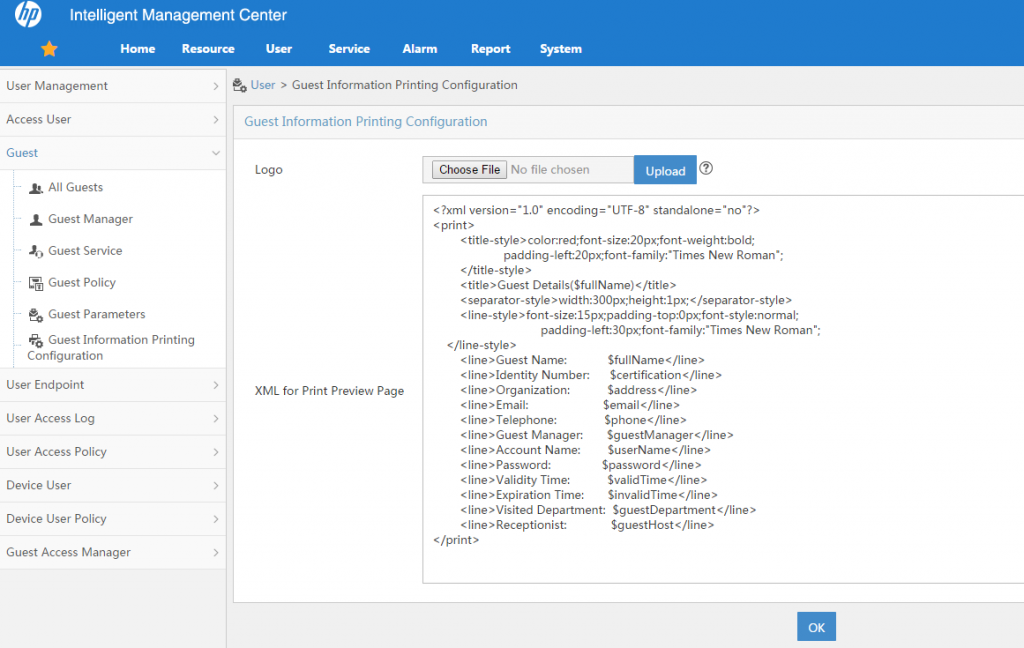
To change the guest voucher you need to login into iMC and go to “User–>Guest->Guest Information Printing Configuration” and you will get a screen like this:

You can use this screen to change the information, which should be printed and you can also add a logo to the voucher. To add a logo to the voucher just click “Choose File” and select the logo you wish to attach to the voucher. Afterwards click “Upload” and the logo is loaded to the iMC server. You cannot determine the position of the logo as the logo will always be at the top of every voucher.
To change the information which should be printed you can use the “XML for Print Preview Page”. The configuration of the information to print is done in
The starting point should always be the
<print></print>tag and everything else should be within those two tags.
To modify the window size, this is the window, which shows the voucher in the web browser, use the
<window-size width="550" heigth="650"></window-size>tag. By changing the values for “width” and “height”, you can determine the browser windows size, which will show the voucher.
You can add a title to every voucher by using the
<title></title>tag. Put this tag directly under the root tag, as in the example above and put the title text between the title tags.
To modify the title to your needs, you can use the
<title-style></title-style>tag. You can use some markup settings to modify your title. Below you will find a list with available options:
| Parameter | Comment |
|---|---|
| color:red | Set the title color. e.g. red |
| font-weight:bold | Set the title font weight to bold. |
| font-site:30px | Set the font size in px. |
| font-family:”Times New Roman” | Set the font family. |
| font-style:normal | Set the font style. |
| padding-top:10px | Set the top padding. |
| padding-buttom:10px | set the buttom padding. |
| padding-left:10px | Set the left padding. |
| padding-right:10px | Set the right padding. |
The values are coming from the example above.
You can configure a delimiter, which will separate the title from the voucher. The tag for the delimiter is
<separator-style></separator-style>If you did not insert the tag, there will be no delimiter between title and voucher.
To display the guest information you have the
<line></line>tag. You can use those predefined strings to let iMC insert the corresponding information:
| Property Name | String |
|---|---|
| Guest Name | $fullName |
| Contact Adress | $address |
| Telephone | $phoneAccount |
| Name | $userName |
| Validity Time | $validTime |
| Identity Number | $certification |
| Guest Manager | $guestManager |
| Password | $password |
| Expiration Time | $invalidTime |
| Visit Department | $guestDepartment |
| Receptionist | $guestHost |
The property name is the corresponding field name in iMC.
You can also configure the style if the line items by using the
<line-style></line-style>tag. The formatting options are the same as for the title.
To save your changes, simply press the “OK” button.
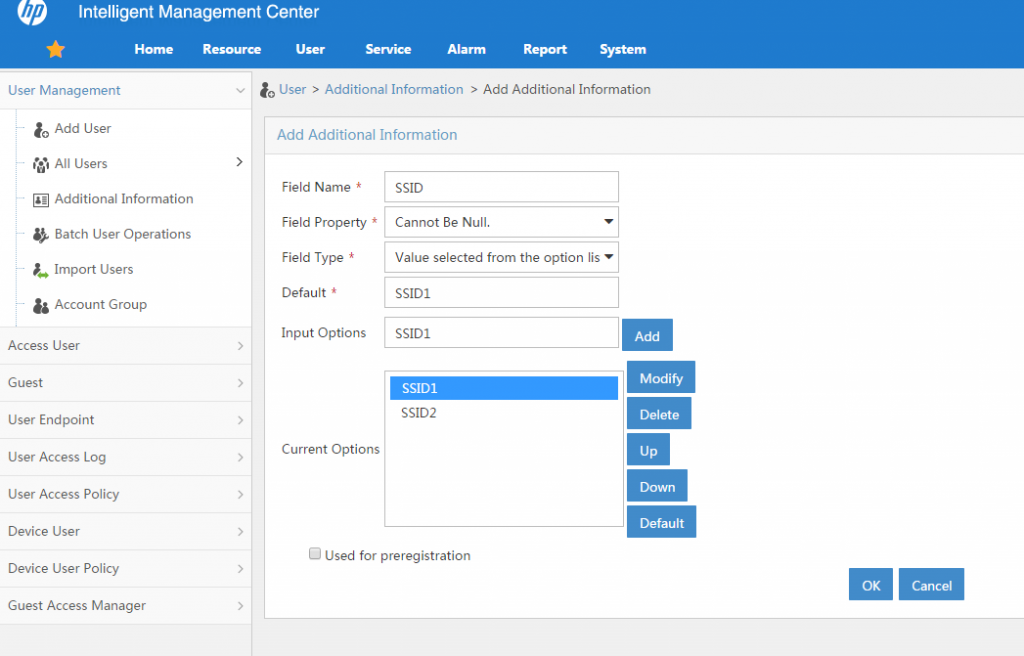
You can add additional information by using simple strings. You can also add new property fields in iMC and use them as the data source. Therefore go to “User–>User Management–>Additional Information” and click the “Add” button:

You are very flexible in adding new properties for a user. I decided to add the SSID as an information. To access the information on the field in the voucher you simply set the $-sign in front of the field name. In my example it would look like this: “$SSID”.
This will help to setup your unique UAM guest voucher, which can be used as handouts for your guests. If you have any questions or feedback feel free to use the comment function.