In this post I will share how to do a bulk modification of guest accounts in iMC UAM. This is currently not possible from the web GUI. You have to work on the DB instead. I figured it out by reverse engineering and testing.
With the new iMC UAM version 7.1 it is possible to allow concurrent logins for guest accounts and I show you how to configure this here:
UAM Portal Authentication Enhancement
If you use this function for newly created guests, it will work without problems, but if you already have existing guest accounts configured, they will have the default values for “Max. Transparent Portal Authentication Bindings” and “Max. Concurrent Logins” which are “1”. They are not able to have more than one device connected the WLAN. To avoid this, you need to find a way to do a bulk modification of guest accounts to change those values for all guest once. This is not possible with the web GUI of iMC UAM. But I found a way to do that by working with the underlying database. I tested this with Windows Server 2008R2 and MSSQL 2008R2. It should also work with other versions of MSSQL and with other databases (Oracle and MySQL) with adopted commands.
Bulk Modification of Guest Accounts
Before reading any further. This is not official supported by HP or in any way tested by HP. If anything goes wrong, you need to fix it by your own!
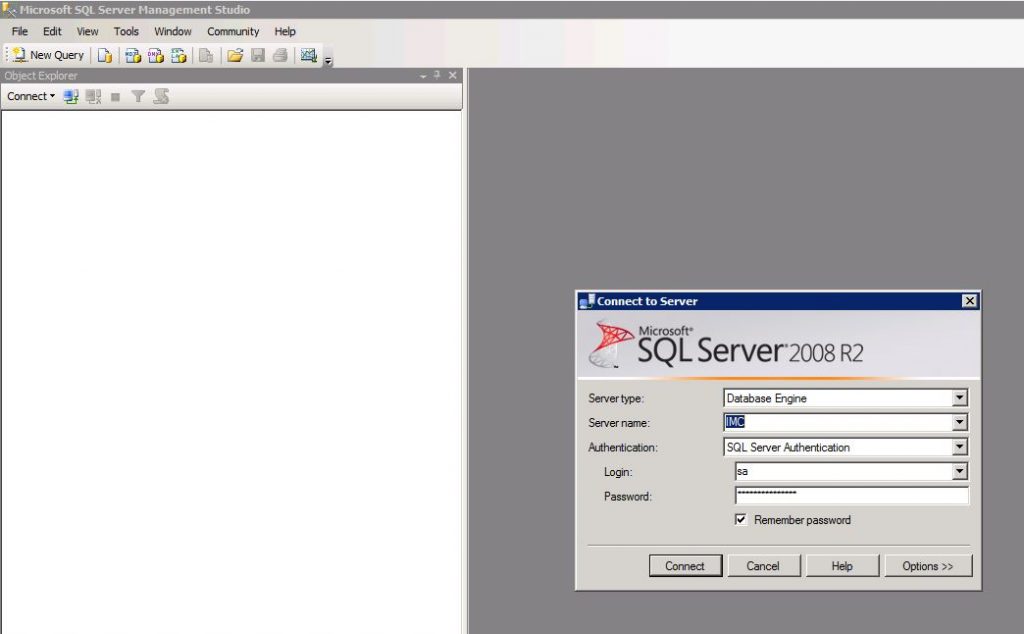
If you are still reading stop all running iMC processes with the iMC agent. Afterwards start the MSSQL “SQL Server Management Studio” by pressing the start button on the database server and go to “All Programs–>Microsoft SQL Server 2008 R2–>SQL Server Management Studio”. Login using the “sa” account with the password you also used during the iMC installation:

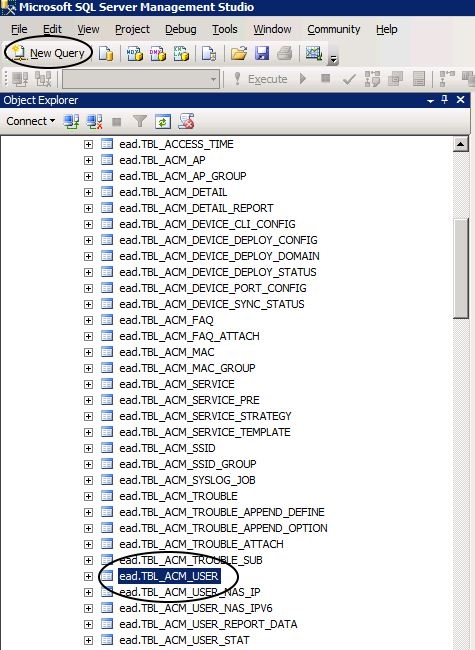
Press “Connect” to open the database connection. In the tree menu on the left side navigate to “[Database Server Name]–>Databases–>ead–>Tables” and look for “ead.TBL_ACM_USER”. This is the table for all users in iMC UAM. Select the table and press the “New Query” button at the top:

this will create a new query editor which is connected to the table. You can now paste this code into the editor window:
UPDATE [ead].[TBL_ACM_USER]
SET [ONLINE_LIMIT] = '4', [PORTAL_FAST_AUTH_MAC_LIMIT] = '4'
WHERE [USER_TYPE] = '4'
I will describe this query. but you can also change other properties of the user. Just change or add them in the line which is starting with the “SET”.
The first line:
UPDATE [ead].[TBL_ACM_USER]will select the table on which we will run the update. This is the table with all user accounts in iMC. Therefore, we use the last line:
WHERE [USER_TYPE] = '4'to select just the guest accounts. They are “USER_TYPE 4”. I figured this out by testing. I have no official documentation what other numbers are available and what the meaning of them could be. My statement will modify all guest accounts, but it should be possible to select smaller groups of guests by using other fields from the table. The line in the middle will actually do the bulk modification of guest accounts by updating the columns which are defined in the statement. You can add more values if you need. Just have a look at the table structure, but be aware, I have no official documentation on the values. You have to figure it out by yourself and test it.
Run the script by clicking on the “Execute” button on the top of the screen. This will run the query and present the result. If everything is working correctly, you should see the number of rows, affected by the query like this:
(30 row(s) affected)Afterwards close the “SQL Server Management Studio” and start iMC again. iMC will load the changes for the accounts from the database.
When changing any values in the database be very carefully, as this could have side effects which can make your iMC installation totally crappy. The small example I wrote about in this post should work fine without breaking anything.
For any feedback or questions, please use the comment function.